Sunday 18 December 2011

Four month update

Despite the lack of updates, work has continued on the car. In rough order:

Brakes
Firstly, and after a lot of trial and error, I fixed the braking problem (the rears were locking up first, which usually led to the back stepping out, and on one occasion to a 180ยบ spin). Sadly I didn't discover the cause until after replacing:

  • Rear callipers
  • Front callipers
  • All brake fluid
  • Pads all round
along with fiddling with the pedal arrangement. Thanks to Peter for spending his Saturday helping me with fiddling with all of the above - even if we didn't solve it, it was useful to double check all these things. A bias bar helped work around the problem, but it clearly wasn't solving the underlying issue, which I later discovered was the union on the front circuit where the pressure switch for the brake lights screws in - this was leaking very very slightly, causing a lack of pressure to the front. Tightening that up solved the problem: simple but a huge improvement.

Oil
This one is still only 90% fixed, but that's probably good enough. There was a small but significant leak, which turned out to be from a little valve on the side of the block (a pressure regulator), where an O-ring had perished. Fortunately I had a suitable sized O-ring kicking about the garage, so, apart from the difficulty of accessing this with the engine in the car, this was a pretty easy fix.

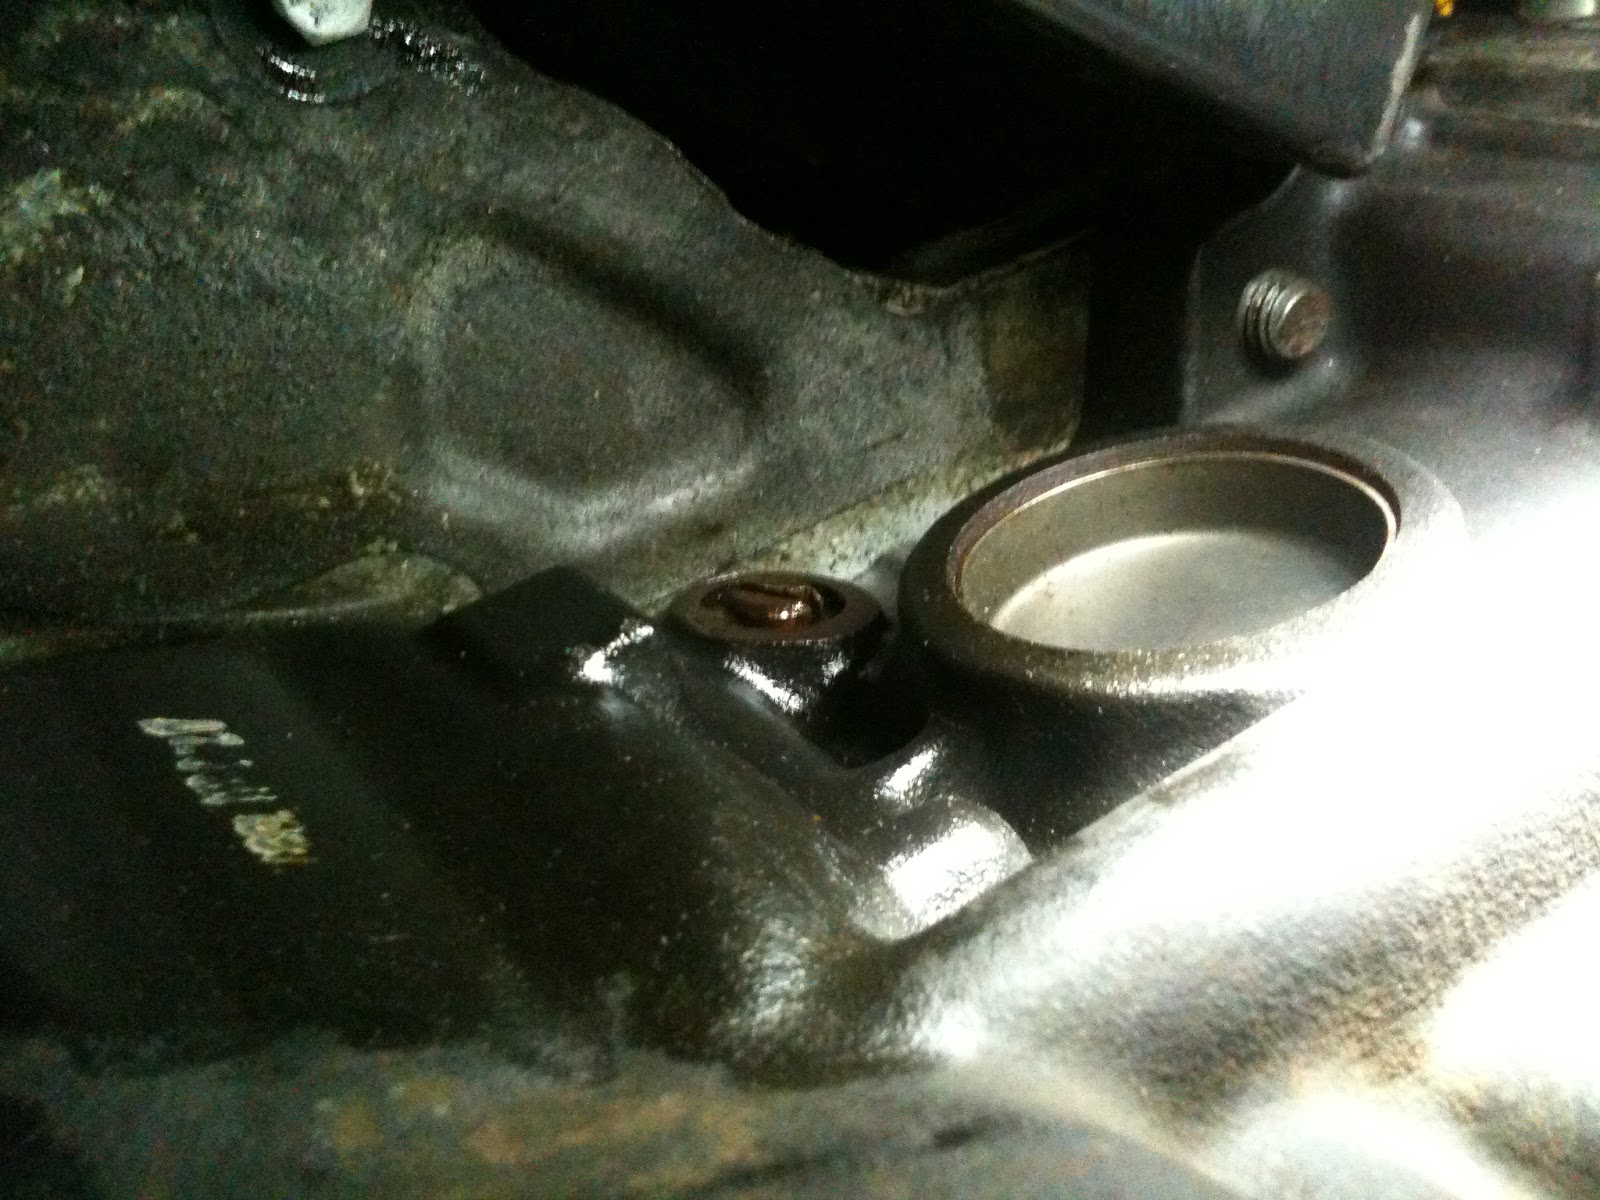
The offending oil pressure valve.

Unfortunately there seems to still be a tiny leak from the sump (which I removed to sort out the oil pump after fitting the engine). It's probably not big enough for me to want to remove the sump again to fit a new gasket (really wish I'd fitted a new gasket first time round) though, so I will just keep an eye on it.

Setup
Thanks to Jason for lending me his wheel alignment kit. Having got all the wheels pointing the right direction, the car feels a lot more stable and controlled. Toe-out at the rear has been changed to toe-in, which has made the handling safer, if less entertaining.

I've also experimented with a couple of different sets of springs, but so far am sticking with the original set at 350 front and 180 rear. These are a touch on the soft side, leading to an amount of body roll, but grip and ride are good so I think I'll probably track the car like this and see how it handles on track.

Jason has also passed on a longer set of wishbones for the front, which will give me more steering lock, which is badly needed, not so much for driving around where there is just about enough lock, but more for parking and manoeuvring. These are yet to be fitted (I'll need to get some longer tie-rods to match), but this should keep me busy in the New Year.

Cycle Wings
Once again, the brackets holding these on broke, this time at a very inconvenient place (on a dual carriage way slip road in rush hour, with no hard shoulder). Not fun at all.

Peter has provided new brackets, and I've experimented a little with how I'm attaching the new wings as I want to keep them detachable, but don't want exposed bolts on the top side. I've bonded them to a bracket with studs pointing down, and then bolted the studs to the main cycle wing bracket. Hopefully the sikaflex is strong enough to keep them attached (and hopefully I've welded the studs on strongly).

New cycle wing with bracket and tube for wiring bonded on.

Main bracket ready for cycle wing.

Fuel Economy
As always, this remains a tricky problem. I saw some improvements when I removed the exhaust, and remounted it at a more natural angle. Previously the supplied brackets meant that the tubes were at a slight angle where they pushed into each other, creating a space where oxygen could be drawn in upstream of the lambda sensors (which, on detecting unused oxygen, would cause the ECU to compensate with extra fuel). A combination of new brackets and replacing the gun-gum exhaust paste I'd previously used with RTV sealant seemed to improve matters, getting fuel economy briefly up to the low thirties... but then it dropped back to low twenties again.
I've since discovered the port on the side of the engine where clean air is injected into the exhaust to improve emissions, which I had blocked off, had maybe not been as well blocked as I thought, which could be a potential source of oxygen getting into the exhaust. I've since fitted the BMW part for blocking this off (turns out the South African market doesn't care about emissions, so they make a suitable part for them), which may or may not improve things.

Other
When setting out for one test drive, I heard a scary sounding grinding noise (it can be heard in the first few seconds of this video):

Not a sick engine. At least, not as far as I know...

Fortunately, this didn't mean my engine was dead - it turned out just to be the water pump bearing failing. Removing the aux belt it was very clearly starting to seize up, so I got a new pump fitted and problem solved. I didn't replace the gasket as it was firmly stuck to the block and I was afraid of scratching the block and ruining the seal forever - this turned out the be the right choice as it didn't leak. I suspect that the tensioner may be on the way out too, but it's not making any funny noises so it will do for now.

I also finally got round to putting a hinge on the front nosecone so that I can easily access the radiator. Another job I wish I'd done ages ago - improving access always seems to be worth investing time in, something I could have benefitted from realising at the start.

So this leaves the car with working brakes, not overly leaking, and with all the wheels aligned and cycle wings fitted... could this be the long hoped for point after which it's all just fine tuning?

Thursday 18 August 2011

More photos

Some photos from Sunday, when I drove to a BMW show up in Gaydon to exhibit the car on the GKD stand. The car went down surprisingly well with the BMW crowd - I'd expected people who are into fast big saloon cars not to be that into a 7 style car, but most people liked it and a few seemed reasonably interested in building one, so a day well spent.

The car performed well on the way there and back, but fuel consumption was, predictably, awful. Peter is sending me some new rear calipers as we suspect the problem may lie with broken calipers, so fingers crossed that will sort it.


Saturday 13 August 2011

Stripes!

Testing on the new engine continues, with no issues other than fuel consumption, which is still poor. More importantly though, the new engine has great compression numbers (205-220 psi, i.e. a difference of less than 7%), isn't consuming oil by the bucket load, and isn't smoking heavily or running rich (no popping and banging on the overrun, which is good, although I do miss the noise). So it looks like I got lucky with a good engine this time round, fingers crossed.

The fuel consumption is a bit of a puzzle though. Clearly, it's not the engine, so it must either be a fuel leak or rolling resistance. I've thoroughly checked for fuel leaks, and found one (the pump wasn't sealing into the fuel tank very well), but fixing it (with plenty of Hylomar Blue sealant) had no effect on fuel economy, which seems to be varying from 44 mpg (pretty sure this was a bad measurement - probably still a high number, but 44 seems ridiculous) to 17 mpg, with 22 being typical. Driving style doesn't appear to be a major factor in these numbers. I've noticed that the rear brakes are dragging - I've tried grinding back the pads, centering the callipers on the discs, and bleeding the brakes, but this hasn't helped at all. Grinding the pads did sort out the issue I was having with the rears locking up first though (probably because I ground them so unevenly that the rears aren't very effective any more) - this has improved stopping distances no end. It looks like this will be an ongoing problem.

In between trying various things to sort out fuel consumption, I picked up the tonneau and fitted that. It doesn't work well with my harnesses (they need to unclip to zip the passenger / driver cover onto the boot cover, and mine aren't the unclipping type), but otherwise it is very good and greatly improves the look of the boot area.

Once that was fitted, I could finally get around to the most important feature of the car: stripes. This took longer than expected, but the results are very much worth the time.

First stripe going on. This one had to come off again as I wasn't very happy with it.

Emily gets to work on the scoop.

Stretching it round the dash. This wasn't at all easy. The hairdryer helped a bit.

Stretching over the dash. Notice the Look of Concentration.

Rear view: stripes, boot cover and M3 badge.

Front view. The numberplate seems to have fallen off.

I also stuck a couple of badges on: the GKD badge on the nose, and an M-sport badge on the rear, so that people in expensive cars know what just overtook them.

Looking forward to getting some nicer wheels on the car - some black wheels will finish it off nicely, but they will have to wait until my bank account is a bit healthier.


Sunday 31 July 2011

Visitor in the paddock

Testing on the new engine continues with (eventually) good results.

After another test drive, the clutch problem returned. I tried to adjust it again by the roadside, but didn't enjoy crouching by the drivers (i.e., road side) side of the car at night so gave up and drove it home being careful not to press the clutch all the way in. Once cold, the problem seemed to go, so perhaps something expands when warm to create the problem

However, after adjusting the pedal as far as it will go, I had another test drive, and the problem did not return, so I think it's fixed. There is still an odd feeling to the clutch pedal as it disengages - I'm not sure what to attribute this to. It's not causing any problems though so I'm just going to ignore it until it does as I suspect the fix would be a new release bearing (i.e., engine out).

After some thought, I decided that the best way to attach the bonnet scoop would be to bond some bolts onto the scoop and then bolt it down - this will give me the option of making a new (better fitting) bonnet in the future but reuse the scoop, having spent an evening wrapping it nicely. This is the result:

Bonnet scoop drying. Bolts were attached by using very large washers covered by Sikaflex. Not sure how long Sikaflex takes to fully cure so I'm going to give it a week before attaching it.

On Friday I got up at 5:30 to trailer the car up to Fibreform for some welding. Dave got the car up on some ramps and showed me the amount of diff movement I was getting by gently jacking the diff... a bit worrying as the diff nose was lifting by 10-20 mm. After a spot of welding and strengthening he had this sorted and advised me to keep the main front mount tight, recommending lock wiring it to ensure it doesn't undo. At some point I'll undo it, thread lock it and lock wire it.

This morning I sorted out the steering wheel for the n'th time as it wasn't central - not difficult but fiddly and time consuming, but it's right at last. Midway through this I had some problems with the ignition barrel - for some reason the steering lock wouldn't release properly and prevented the key from turning. Fortunately I eventually fixed it by hitting it with a hammer, but I'm keeping a look out for a cheap Ebay replacement part.

I tried another test drive and was pleased to find that the car is performing well with no major problems.

There are a few tasks remaining: the rear brakes are dragging a bit (this is probably what was causing them to lock up before the fronts); and the traction control is playing up on the new engine. Not sure what the solution will be for the traction control. It's booked in for the tonneau fitting on Friday, which will be good to have. Also the car is very dirty and needs a clean - hopefully the vinyl wrap will clean up easily.

Finally: today's visitor to the paddock:

I found this fellow hopping around by the 328 engine.

I caught him and let him go in the field behind the house.

Friday 22 July 2011

A very long post about putting the new engine in

It doesn't seem like a month since the old engine came out, but according to my last blog entry, apparently it was nearly a month ago that the 328 came out. With the engine in, it seems like it ought to just be a case of ticking off a few details, but as with software, the first 90% of the job takes 90% of the time, and the remaining 10% of the work takes the other 90% of the time. So it was here: all the little things took time, and interspersed with waiting for parts, the engine swap has not been particularly speedy.

After getting the engine in, I made up a mount for the oil cooler and fitted that. Unfortunately, the adapter needed to plumb it into the engine took an unreasonably long time to arrive from the U.S., and without it, I couldn't get oil pressure, and therefore couldn't start the engine or make any progress. When the overpriced but essential widget finally did arrive, I spent ages cranking the engine with no fuel and spark plugs removed (to reduce load on the crank) trying to get oil pressure. I'd been warned that this might not happen easily, and indeed it didn't.

After faffing around for ages trying to prime the oil pump I admitted defeat, drained the engine of oil, took the sump off and removed the oil pump. Since I'd already spilt a fair amount of oil on the garage floor, this involved a lot of lying on the floor, soaking it up and making a huge mess. I dismantled the pump, stuffed it full of vaseline, poured oil into the pick up pipe and sealed both ends of the pipe with vaseline to prevent the oil from escaping, and put it back. I didn't fancy doing it twice so I probably used a good half tub of vaseline. I put the sump back and then started doing up the bolts.

In so doing, I got a good view of the bottom end. It looks healthy.

The oil pump. Really hope I did that nut up tightly enough when putting it back. The internet suggests welding it on but I think that's overkill (and I can't weld), so I just followed Haynes and torqued it up with threadlock.

Shiny crank.

More crank. Note oil pick up pipes.

Underside of piston.

I was mildly concerned by the marks on the underside of the pistons, but apparently this is normal.


My pillow, post oil-pump work. Emily took it surprisingly well.

Part of bolting the sump on involves doing up a bolt inside the gearbox bell housing via a socket extension through a tiny hole. Of course, when removing the extension, the socket popped off the end of it and dropped into the inaccessible bell housing ready to destroy the flywheel. I attempted to salvage the situation with some thorough cursing, anticipating having to remove the engine to rescue the socket, but to my great surprise, it came out eventually by poking it with an allen key through the little hole.

Everything back in order, I cranked it, and got oil pressure. Phew.

With the engine in and ready to start running, I put the exhaust on, spent ages getting the manifold on, then realised that the front side panel wouldn't go over the manifold, spent ages getting the manifold off, threaded the front wing on again, then put the manifold back on... a bit of a waste of time there. To reduce any future pain I tapped the holes for every rivet that I had to drill out and replaced with little dome-head bolts instead, which is how all panels that come off will be done in future. This will make getting panels off much easier in future. Wish I'd done that everywhere to start with, although tapping all those holes would have been pretty tedious.

I also had a look at the bonnet. The throttle cable arrangement sticks up a lot on the new engine:

No way the bonnet will go over this.

So sadly I had to do this.

Which will be covered up by this. (Not fixed in place yet, hence not straight).

I'm not massively keen on having a bonnet scoop, and as a future project I will look into an alternative throttle arrangement which lets me have a nice clean bonnet again - but for now I've vinyl wrapped the scoop so it matches the bonnet and I think it will look OK.

The next step, now that the engine was getting oil pressure, was to get it started. I put the higher-pressure fuel pump in (future plan is to install the old pump at the other end of the tank to reduce oil starvation in the corners), and hooked up all the basic stuff on the engine, along with the loom. The loom is a bit of an oddity, as it's off an SMG (fancy flappy-paddle gearbox) car, so it has an extra ECU slot for the gearbox ECU, several additional connectors for the extra SMG wiring, etc. Fortunately, it turns out they will still work on a manual car - it's just a case of bridging one relay to be always connected (on an SMG car it prevents starting the car when in gear, I think). Relay identified (the half-size one next to the fuel pump relay) and bridged, I got the car sort-of running without too much difficulty.

I say sort of as it was billowing smoke, stalling a lot, idling very badly, and so on. I hooked up the lambdas from the 328 (they're a different part number but I'm pretty sure they're electrically identical), bought and fitted a new MAF, fiddled around a lot, and so on, with limited success. The only clue was that when I unplugged the MAF, it would idle OK, but as soon as I plugged it in, the revs would jump around and then the engine would stall. Jason and Ben felt that a third MAF was required, but my wallet wasn't feeling in the mood, so I kept looking for another solution. Eventually I found what I was looking for: a small vacuum leak after the MAF. This meant that the engine was receiving more air than the MAF was measuring, and hence running badly (very lean) and stalling. With the MAF unplugged, it had to estimate air based on the throttle position and the current rpms - and obviously didn't care what path the air took to get into the engine, so held a decent idle. I plugged up the hole, and got one step closer.

Unfortunately, I still had this problem:


Smokey engine. This is all too familiar. 

And this one:

Noise on pressing clutch all the way in.

The smokey engine was not a huge concern: I'd half expected this sort of thing as it hadn't been run for a while and had no doubt built up condensation while standing. After twenty minutes or so of coming up to temperature, the steam / smoke died away and since then, it's behaved properly, smoking / steaming a little when cold but not for very long.

The clutch was a much more worrying issue. I really, really didn't want to take the engine out to replace a clutch bearing... but it wasn't the kind of noise I could ignore. Pete and Peter reckoned it was a failed bearing (i.e., engine out to fix), although the sound was a bit grindy. I had a more palatable idea: I think it's the clutch release arm (which doesn't spin) contacting the pressure plate (which does). This seems plausible as it only happens right at the end of clutch travel, after the clutch has fully disengaged, as if it were very slightly over-extending. Happily the fix for this does not involve taking the engine out - it's just a case of adjusting the pedal slightly to reduce travel.

I made the necessary adjustment, and was greatly relieved to find that the clutch now operates perfectly and silently, so I think this has solved the problem.

I celebrated by quickly sticking the headlights, nose and bonnet back on, and going for a quick test drive, the first with the new engine. I kept it below 3k rpm and gently pootled about, as (a) it's the first test run, (b) it was wet and (c) the diff mount needs additional bracing before it can handle full power. The engine performed very well, although the weather didn't. After a few miles, I turned around and checked out the fault codes. There are a few that I suspect are down to minor wiring issues, and two down to missing components (air con and the fuel evaporation cannister) - so a good result. Finger crossed the new engine continues to perform well.

Sunday 26 June 2011

Engine goes in, engine comes out..

After a recent trip to Bristol (about 360 miles round-trip), it became clear that the 328 engine was not in a viable condition. I reached this conclusion when I had to stop at a service station to put in over a gallon of oil at motorway prices (about £70). My best guess is that it's using about 1 litre per 200 miles. I've also learned that Jason's car with a 3.2 litre engine does about 30-32 mpg, so the 18 mpg that I'm seeing is nearly half what it should be. Plus, there's the cost and hassle of replacing the oil separator valve every so often because it can't handle the volume of oil coming out of the crankcase.

So I started searching Ebay for a new engine. Initially I was planning on a straight swap with another 328 for cost reasons, but ended up, inevitably, with a 3.2 litre M3 EVO engine, good for about 320 bhp, or around 450 bhp / ton - a bit less power than an R500, but a lot more torque, so performance should be acceptable. If it works, which remains to be seen. I figured that if I was going to go to all this effort, I might as well at least get something positive out of it. Plus, the redline of 7600 (with 8000 safely achievable with a little light remapping) will be considerably more fitting for a lightweight sports car than the 6200 of the 328. The only real downside of the M3 is the cost, which is considerable: I definitely won't be getting new wheels any time soon :-(

I picked the engine up on Wednesday from a garage in London. They had a couple of BMW race cars outside, so hopefully they know their stuff. They bought the engine as a spare, and rebuilt the bottom end with some new bearing shells and con rod bolts, so it ought to be in good condition.

After a bit of engine inspection and Ebaying the missing bits on Thursday, I started the swap on Friday night. Thanks to Jason and Rad-tec for sending me the bits I needed so promptly. Pictures follow:
Most exhaust ports looked like this...


But 1 and 6 looked like this. I'm not too concerned - the seller reckons it has just leaked through from storing the engine upside down (on a stand I assume). Makes sense as pistons 1 and 6 would be in the same position.

Old engine coming out.

Engine coming out. Surprisingly, not too hard doing this on my own.

Impromptu flywheel locking tool constructed using the awesome power of two hammers. This worked rather well.

Home-made clutch alignment tool. Did the job nicely.

New engine ready to go in. Note trolley for sliding gearbox onto engine.

Chassis adjusted to allow the slightly longer engine to fit in.


Unpleasant surprise - I thought the stud had been cross threaded. Happily it turned out to just be a bent stud. Phew.

All in all a fairly painless weekend (not literally, obviously - I managed to stab my finger with a stanley knife requiring swift application of superglue to stop the bleeding) but successful. I didn't get the new engine in as one of the gearbox bolts snapped when removing the gearbox from the old engine - since these can't be put in with the engine in the car, installation of the new engine will have to wait until I've obtained a new bolt. Otherwise everything is ready to drop the new one in.

Most pointless mistake of the weekend: spending an hour with the angle-grinder getting the old clutch off because I needed to reuse the plate which sits between flywheel and engine, and the bolts holding the clutch on had rounded. Once I had the flywheel off I realised that the plate, instead of going all the way around the crank, was basically U shaped and could have easily slid off without even loosening anything.

Getting the gearbox on the new engine was a bit of a faff, but the trolley helped a lot. The best method seems to be: adjust crane to get engine the right height against the gearbox. Then adjust the engine using the load-leveller so that the gearbox lines up flush vertically against the clutch housing. Readjust height slightly. Gearbox then goes on pretty painlessly. I didn't have a clutch alignment tool so I had to wing it with a socket extension wrapped in tape. As it turned out, this did the job just fine.

I can't compression test the engine until it's got some oil in it, and I can't get oil in it until the adapter turns up from America (I've gone with a very shiny custom oil cooler - the only downside being the difficulty of getting a suitable adapter). Hopefully that will be soon. Then I need to figure out the loom, and make the necessary adjustments as the loom is off an SMG gearbox car (I believe it's a simple case of jumping a relay... I just don't know which one). Then it's car back together and drive gently up to Fibreform to get the diff mount beefed up and to replace the chassis rail which I removed.

Friday 20 May 2011

Progress

Lots has happened since I last posted over a month ago. In order (as far as I can remember)...

Firstly, I had an issue with oil. The crankcase breather was spewing out an awful lot of oil vapour. This should be taken care of by the CCV which is supposed to separate oil from air and return the oil to the sump, but unfortunately my CCV (which was brand new) failed and started returning oil to the engine bay instead, with a fair bit going back into the inlet manifold...

Oil being returned to the engine bay...


... and to the inlet manifold. That's a big puddle of oil.

After a bit of umming and ahing, I decided to try replacing the CCV again on the assumption that the previous one was faulty from new. The other potential explanation is that it failed because of the quantity of oil coming from the engine, due to blow by (a compression test suggests that there is more blow by than I would like). Replacing the CCV is cheaper than replacing the engine, so I'm trying that first. It's too early to say if it's the right choice, but so far it seems to be working; there is a lot less oil in the manifold now.

I took the rocker cover off and had a look for oil leaks...

... everything looks normal.


Around this time, I also decided to replace the inlet manifold with an 325 manifold. The 328 produces 190 bhp, whereas the 325 produces 189 bhp with 0.3 L less capacity... the reason being that the 328 had a restrictive inlet manifold in order to satisfy German emissions regulations. So, sticking a 325 manifold onto a 328 is supposed to rectify this and release another 20 bhp or so.

The swap was straightforward. The only issue is that the 328 has more holes in the manifold to plug bits into, so with a 325 it's necessary to get creative with plumbing to get everything attached. It's a bit easier for me than for most people who do this swap as there are a couple of hoses that are on a proper 328 that I don't use. It's hard to say if performance has improved, as I didn't have many miles under my belt with the old setup, but certainly it feels extremely fast now, which is what I'm after really.

I installed a big bore throttle body at the same time, which apparently is the thing to do with this manifold as it flows a lot more air than the standard throttle body.

Installing the new manifold...

...there is a lot of gubbins under here...

Making an adaptor plate to fit the M52 throttle body to the M50 manifold.

This all done, I got some driving in but quickly discovered that I was hitting a limiter somewhere in the 5200 - 5500 rpm region. Given that the limiter is supposed to be at 6200 (which is already too low in my opinion) this is pretty unacceptable.

I tried swapping over the cam position sensor, which seemed to work with the car on the drive, but as soon as I went for a drive, the limiter came back - obviously it didn't kick in until the car was under load. Some more internet searching and eventually I figured it out (this took me at least a week from discovering the problem to fixing it) - Peter's wiring diagram is for a Bosch ECU, which is used on most E36 cars, but not the 328, which has a Siemens ECU. The wiring is almost the same, but the ECU requires a signal for vehicle speed (from the speed sensor in the diff), which feeds into the large X20 connector on pin 14 for the Bosch ECU, but pin 9 on the Siemens. Without it, it sets a 5200ish limiter. Adjusting the wiring solved the problem. Once I have the fueling issue sorted, I'll look into a remap to get the limiter raised again to around 7000, which I think is the safe limit for an unmodified 328 - possibly at some point I'll fettle it (stronger valve springs, etc) with the aim of getting it higher again.

The remaining engine issue is that it is still getting below 20 mpg. A real 328 will get around 30, and I'd expect this car to do significantly better, being so much lighter. I noticed that the ECU (#4, if you're counting) was complaining about the post-cat lambda sensors being missing (which they are). The ECU is off a 528, which has these extra lambda sensors. I don't think they should affect fuelling, but it's possible. To try and rule this out, I caved in and bought ECU #5, this time off a 328. It's in and working, but I have yet to get enough miles to see if it's solved the problem. Alternatively, the 528 ECU might have had a bad map - again, a new ECU would solve this, though I think this scenario is unlikely. Still, I need to rule out the ECU as a possible source of the problem, so it's a necessary step.

Last weekend, along with the ECU, I also got hold of 6 m of vinyl wrap. After getting a quote for painting (£800ish) I was keen to explore other options, and having seen Jason's wrapped car, which looks fantastic, I decided to go that route instead, as it's only £300 for the vinyl, and I can apply it myself.

I left Emily in charge of deciding how to chop it up so as to cover all the panels with 6 m of vinyl... sadly she got it a little bit wrong, resulting in two extra joins. They'll be almost totally covered by the boot cover though, so it's not the end of the world. The 3M Di-Noc wrap proved pretty easy to apply, although there is a definite knack to it. The panels I did last look much better than the first ones, even though I left the harder shapes to the end. Still, I'm very pleased with the end result.

Cleaning the bonnet in preparation.

Fitting the wrap around the exhaust primaries.

One side of the car mostly done.

Looking good. Needs stripes.

The result looks good, but clearly needs some stripes... the only question is, what colour? One option is the BMW colours; I'm also tempted by a couple of plain black stripes. The plan is also that the car will have black wheels. Your ideas / suggestions welcome?

This was the original plan, but now I'm not so sure...

Currently thinking about something like this.

Sunday 10 April 2011

Emily's first drive

Peter was true to his word and got the brackets back to me very quickly (along with the boss for my steering wheel, which also needed a spot of welding doing). Unfortunately, where he'd welded the bracket back together, it had bent significantly, and, since he'd also reinforced it, it was quite resistant to being bent back into shape. I hit it with a sledgehammer a bit, and got it usable, but it's still not where it should be. I'll probably solve this by making new holes in the bracket, rather than trying to bend the bracket any further. Anyway, the front cycle wings are now attached, and hopefully stronger than before.

I've also got a proper steering wheel now, which is a big improvement. It's detachable, so getting in and out is easier - hopefully there won't be any incidents with it detaching when it shouldn't detach. Emily is now able to get in (with the BMW wheel, she wasn't able to fit), so she had her first proper drive, finding it "a bit scary" but otherwise good, I think.

Ready to go. Ride height and indicators still need sorting.

Various jobs remain to be done, but the car is starting to come together. The windscreen makes it much more practical, and the reflections from the scuttle are not a big issue in practice. The most important thing, I think, will be the new throttle pedal that Peter has kindly offered as a free upgrade :-) This should reduce pedal travel significantly (currently I need to move my whole leg rather than just pivot at the ankle) and is also narrower, which will make life a bit easier. A proper suspension setup is also on my list, and of course vinyl wrapping the car and fitting the tonneau cover.

Very pleased with how it is turning out so far though.

Sunday 3 April 2011

First two breakdowns...

After getting the car road legal on Thursday, I forgot that (a) the car is low, and currently lower than it will be once I've set the ride height properly, and (b) the speed bumps at work are very harsh. On Friday I drove into work, and accidentally clipped a speed bump with the sump.

The sump - fortunately - was not significantly harmed (it lost a couple of cooling fins, but no leaks), but the resulting shock obviously moved the engine and gearbox, which had unfortunate consequences for the gear linkage. The gearstick pivots in an arm which runs between the gearbox and the chassis, for the purpose of providing a suitable pivot point - unfortunately, it doesn't have much ability to move and absorb impact, so it snapped instead. I'm going to try and find a way to add some rubber bushing to protect it in future.

Broken one on the left. Note (suspicious) old weld at the top.

Fortunately the local dealer was able to get one in for the next day for only £13, so not a massive problem. I left the car at work overnight and returned, with tools and parts, on Saturday to fix it.

It's interesting to note that the old arm had already been welded by the previous owner, so I wonder if it had snapped in a similar impact before, which might have weakened it?

Anyway, car fixed, I drove home in it with no problems... until the bracket holding a front cycle wing on snapped. Peter had previously mentioned that he'd seen failures with these brackets, but unfortunately he'd just given me some advice on welding it up to make it stronger, which I hadn't got round to doing. The cycle wing survived, but the car is now off the road until I get the brackets reinforced. Fortunately Peter said he could fit the welding in for me before he's off on holiday, so this should be sorted pretty soon.

This happened.

Causing this.

I took advantage of having the car not-really-drivable (no cycle wings at the front means a face full of gravel) to get on with the windscreen today. After an awful lot of faffing about bending and trimming the frame, and trying to bend the supporting brackets (which didn't want to bend on account of being incredibly strong), I managed to get the windscreen fitted in a reasonably neat way. It's not perfect - I over-trimmed the bottom part of the frame, leaving a few mm gap to the vertical part, and the supporting brackets aren't bent exactly as I would have liked, but from a distance it looks good.

The rubber still needs trimming.

Lots of Ackerman. Front numberplate is much too big... it could easily break and fall off. So easily.

The height of the screen seems about right, when sat in the driver's seat. My only concern is that the white scuttle is going to reflect quite badly - I may need to paint it black or something - but I will need to drive it a bit first to see if this will really be a significant issue. Anyway, this should allow me to drive without needing a helmet, which will be a nice improvement.